How-to: Ken Shirt
Hello, dollings...
Welcome to yet another how-to post. So finally I have made something for the male doll, right? I know, I know.. ;D
The YouTube playlist version of this Dress Shirt Tutorial for Ken is already up, so for you guys who'd want to check that out too, here's the LINK.

For this doll garment, I used the following materials and tools:
Alright, I think we're ready! Let's get crafting!
1. Gather your sewing tools and materials.

2. Trace your sewing pattern pieces on the wrong side of the fabric.

3. Cut all needed fabric pieces for the shirt, with your preferred (size of) seam allowance added in.
4. Stitch the shoulder seams.

5. Cut slits into the curves of the neckline and the arm hole edges.

6. Attach the cuffs to the sleeves.

7. Sew together the collar assembly pieces.

8. Flip over the collar assembly and baste to temporarily flatten.

9. Take the collar stand pieces, and place the collar assembly in between the two collar stand pieces.

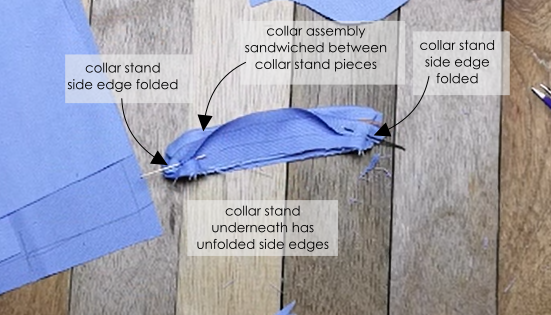
10. Sew the collar stand pieces and the collar assembly together.
11. Flip over the collar stand pieces for the collar to come out.

12. Pin the unfolded collar stand side to the shirt neckline.

13. Sew the collar stand to the neckline.


14. Trim off seam allowances that gather inside the collar stands.

15. Insert all visible seam allowances into the folded collar stand and pin to secure.


16. Sew to secure the combined collar assembly to the neckline.

17. Make sure to hide the stitches under the seams.

18. Make sure all visible seams in the neckline are inside the collar stand, including the shirt placket folds.


19. Cut slits into the curves of your sleeve pieces.

20. Pin the sleeve to the armhole and sew.


21. Fold the sleeve cuff by its equal partition.

22. Fold the seam toward the inside of the cuff.

23. Also fold the other side of the cuff hem inwards and secure with a pin.
24. Sew the sides of the cuff.


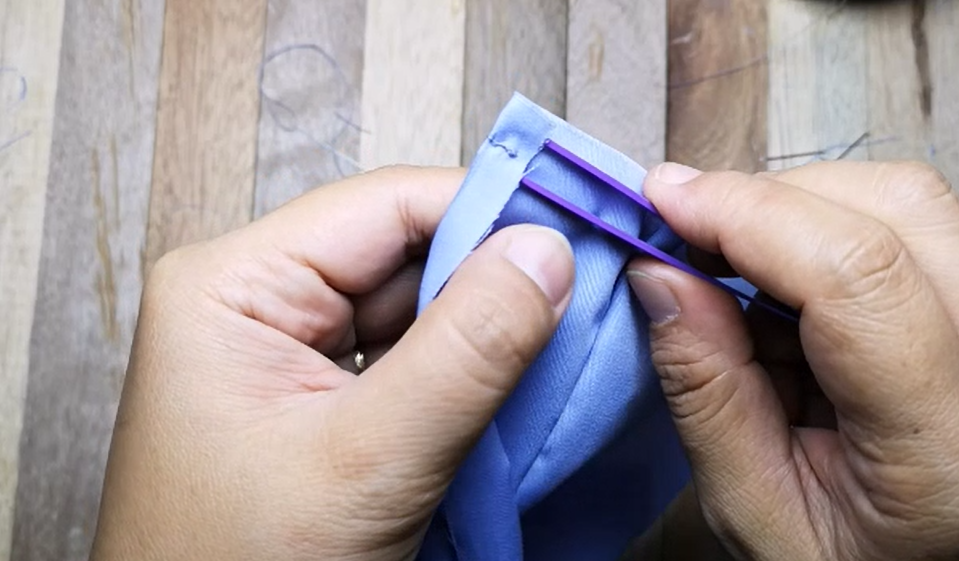
25. Flip the cuff to the right side. A tweezer helped me get to the innermost corner.


26. Secure the cuff by stitching under the seam folds.


27. Pin the side and sleeve seams and then sew.


28. Do Steps 19 up to 27 to attach the other sleeve and to hem the cuff.

29. Before hemming the garment's bottom edge, set the corners of the placket by pinning then stitching to secure.

30. Flip the fold to the right side.

31. Pin to secure the hem.

32. Stitch from each of the placket down to the bottom edge.


33. Sew in some snaps.

34. Get your dude to fit and we're done!

Welcome to yet another how-to post. So finally I have made something for the male doll, right? I know, I know.. ;D
 |
| It's hard to tell but I'm sure he's loving it ;P |
The YouTube playlist version of this Dress Shirt Tutorial for Ken is already up, so for you guys who'd want to check that out too, here's the LINK.

For this doll garment, I used the following materials and tools:
- Woven fabric
- Matching thread
- Another thread for basting, preferably contrasting color
- Metal snaps (I used three for this piece)
- Hand sewing needle/s
- Pair of scissors
- Pencil for marking on fabric
- Sewing Pattern that will soon be available on my Etsy store
- Stitch Ripper
- Tweezer
- Plastic ruler
Alright, I think we're ready! Let's get crafting!
1. Gather your sewing tools and materials.

2. Trace your sewing pattern pieces on the wrong side of the fabric.

3. Cut all needed fabric pieces for the shirt, with your preferred (size of) seam allowance added in.
 |
| Top left are collar and collar stand with two pieces each. Before cutting, I basted together each pair to avoid moving around. |
4. Stitch the shoulder seams.

5. Cut slits into the curves of the neckline and the arm hole edges.

6. Attach the cuffs to the sleeves.

7. Sew together the collar assembly pieces.

8. Flip over the collar assembly and baste to temporarily flatten.

9. Take the collar stand pieces, and place the collar assembly in between the two collar stand pieces.


 |
| I also pinned and basted the collar+collar stand assembly before I start sewing. |
10. Sew the collar stand pieces and the collar assembly together.
 |
| Make sure to sew up to the curves of the collar stand and stop at the folds. |
11. Flip over the collar stand pieces for the collar to come out.

12. Pin the unfolded collar stand side to the shirt neckline.

 |
| Pinning before sewing ensures that the neckline aligns with the collar stand. |
13. Sew the collar stand to the neckline.


14. Trim off seam allowances that gather inside the collar stands.

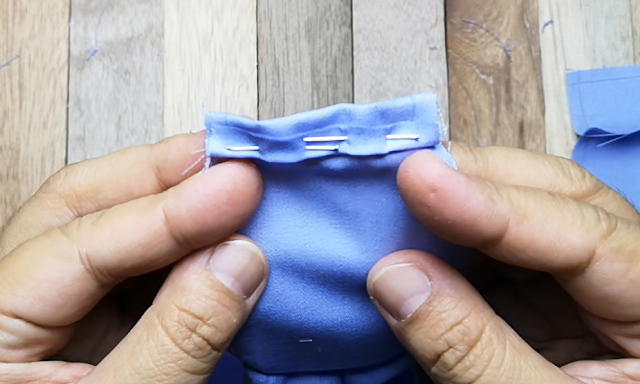
15. Insert all visible seam allowances into the folded collar stand and pin to secure.


16. Sew to secure the combined collar assembly to the neckline.

17. Make sure to hide the stitches under the seams.

18. Make sure all visible seams in the neckline are inside the collar stand, including the shirt placket folds.


Whew!
That was crazy collar sewing there!
Now, on to sleeves, which isn't as painful to do ;P

20. Pin the sleeve to the armhole and sew.


21. Fold the sleeve cuff by its equal partition.

22. Fold the seam toward the inside of the cuff.

23. Also fold the other side of the cuff hem inwards and secure with a pin.

24. Sew the sides of the cuff.


25. Flip the cuff to the right side. A tweezer helped me get to the innermost corner.


26. Secure the cuff by stitching under the seam folds.


27. Pin the side and sleeve seams and then sew.


28. Do Steps 19 up to 27 to attach the other sleeve and to hem the cuff.

29. Before hemming the garment's bottom edge, set the corners of the placket by pinning then stitching to secure.

30. Flip the fold to the right side.
31. Pin to secure the hem.

32. Stitch from each of the placket down to the bottom edge.


33. Sew in some snaps.

34. Get your dude to fit and we're done!

Yay! We just finished a Ken Shirt!
Can you believe that? I can't, almost!
I dreaded making it for so long, but finally, someone inspired me to do it!
Thanks to you, doll! You know who you are...
And thanks to you for coming over here at my blog ;)
I hope you've picked up some doll garment tips today.
See you on my next post!
xoxo,
shasha
The information is meaningful and magnificent which is shared here. Very interesting and informative article.Blue Spread Collar Jacket
ReplyDelete