How-to: Hoodie Pullover
Hey ya, dollings!
Welcome to this page where I show you how I made this hoodie pullover, hand-sewn (yes, RIP hands). I never knew until recently that we can make such tiny garments entirely by hand. So glad I tried it!
pencil
sewing pattern pieces (you can use or make your own, or buy from my store here and here)
scissors
thread and needle
bigger needle for inserting the string
string ( I used cross-stitching threads)
beads (2 at least)

2. Cut the traced fabric pieces with enough seam allowance. I usually use about 1/4 inch.

3. Hem the pocket edges.

4. Stitch the pocket to the center bottom of the front panel.

5. Do the shoulder seams.

6. Attach the sleeves to the assembled back and front panels.

7. Cut about 1-inch x 1.5-inch or 2.5cm x3.5cm of fabric to be used as your sleeve cuff.

8. Fold the sleeve cuff cross-wise, facing wrong sides, and attach/sew the longer side to each of the sleeve's edges.

8. Seam together the sides of the sleeves down to the torso sides.

9. Secure the seam allowances of the sleeve cuffs for a cleaner look.

10. Cut a fabric piece for the bottom hem band, and fold lengthwise facing right sides, and stitch together side edges.

11. Once sides are sewn together, flip over and fold such that wrong sides face each other, making sure to flatten the seam allowances inside to avoid bulk.

12. Pin to secure the folded assembly to the raw hem of the front and back panels.

13. Stitch bottom cuff to the raw hem. Take note that the band or bottom hem cuff is shorter than the actual total torso width to give it that gathered look, like in the photo below.

14. Take the two hood pieces and stitch them together at the curved side.

15. Fold the hood hem and finish the edge with a backstitch.

16. At this stage, it is easier to insert the hoodie string and lock with beads.

17. Attach the hood assembly to the raw neckline of the assembled pullover. Pin or baste first if needing support.

18. I usually add a finishing stitch nearby to strengthen the assembly...

And you're done!
I hope you are getting as much help you need from this how-to post. And of course, don't get too hung up with the details. Each one of us has our own unique way of doing things. Don't forget, you're not learning if it wasn't fun!
Enjoy...
xoxo,
shasha
Welcome to this page where I show you how I made this hoodie pullover, hand-sewn (yes, RIP hands). I never knew until recently that we can make such tiny garments entirely by hand. So glad I tried it!
 |
| Curvy Girl in the hoodie pullover hand-sewn in this tutorial |
 |
| Articulated Ken sporting his own hoodie pullover using the same process below |
Here's how I did it...
By the way, if you'd like to see my step-by-step process in video format,
Prepare the following tools and materials:
Stretchy fabricpencil
sewing pattern pieces (you can use or make your own, or buy from my store here and here)
scissors
thread and needle
bigger needle for inserting the string
string ( I used cross-stitching threads)
beads (2 at least)
Let's start crafting!
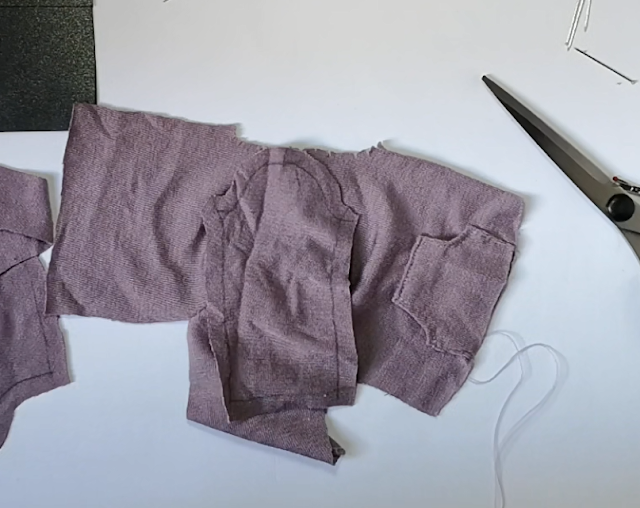
1. Trace the pattern pieces on the fabric.
2. Cut the traced fabric pieces with enough seam allowance. I usually use about 1/4 inch.

3. Hem the pocket edges.
Note: For the Articulated Ken pattern, the pocket pattern is traced on the front top pattern piece.

4. Stitch the pocket to the center bottom of the front panel.

5. Do the shoulder seams.

6. Attach the sleeves to the assembled back and front panels.


7. Cut about 1-inch x 1.5-inch or 2.5cm x3.5cm of fabric to be used as your sleeve cuff.
Note: For the Articulated Ken pattern, sleeve cuff size is approximately 3.5cm x 5.0 cm or 1.5-inch x 2-inch already including seam allowance. However, you can always choose your own dimensions to give the garment a twist from the original pattern ;)

8. Fold the sleeve cuff cross-wise, facing wrong sides, and attach/sew the longer side to each of the sleeve's edges.

8. Seam together the sides of the sleeves down to the torso sides.

9. Secure the seam allowances of the sleeve cuffs for a cleaner look.

10. Cut a fabric piece for the bottom hem band, and fold lengthwise facing right sides, and stitch together side edges.
Note: For the Curvy Barbie pattern, the bottom hem band is approximately 1-inch x 5-inch or 2.5cm x 13.0cm already including seam allowance.
For the Articulated Ken pattern, the bottom hem band is approximately 4.5cm x 15.0cm or 1.75-inch x 6-inch already including seam allowance.
However, you can always choose your own dimensions to give the garment a twist from the original pattern ;)

11. Once sides are sewn together, flip over and fold such that wrong sides face each other, making sure to flatten the seam allowances inside to avoid bulk.

12. Pin to secure the folded assembly to the raw hem of the front and back panels.

13. Stitch bottom cuff to the raw hem. Take note that the band or bottom hem cuff is shorter than the actual total torso width to give it that gathered look, like in the photo below.

14. Take the two hood pieces and stitch them together at the curved side.

15. Fold the hood hem and finish the edge with a backstitch.

16. At this stage, it is easier to insert the hoodie string and lock with beads.

17. Attach the hood assembly to the raw neckline of the assembled pullover. Pin or baste first if needing support.

18. I usually add a finishing stitch nearby to strengthen the assembly...

And you're done!
I hope you are getting as much help you need from this how-to post. And of course, don't get too hung up with the details. Each one of us has our own unique way of doing things. Don't forget, you're not learning if it wasn't fun!
Enjoy...
xoxo,
shasha
Comments
Post a Comment
Let's chat!