How-to: Hoodie Dress for Dolls
Hey guys! Welcome to your next how-to miniature clothes project!
I have always loved a hoodie because I'm a shy person (really?), and hiding is my top talent haha!
Kidding aside, I had been wanting to make hoodies for a long time, but hoodie dresses were something exciting because I haven't yet owned one.
So here's a Youtube video playlist that I compiled for you to see how I made the piece.
My model in this sewing demo is my doll Aki, which is in a Curvy Made to Move Barbie body. You may be making this piece for a different doll body type, but you can still use this process I have compiled. Just make sure you have the right pattern for your doll. If you are interested, this curvy hoodie dress pattern is available at my Etsy shop, atelierniSHASHA.

Knit/stretch fabric


Let's start sewing!


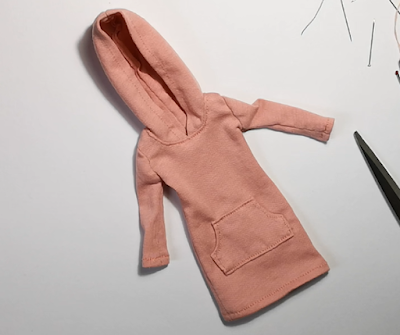
 |
| Aki enjoying her curvy body in this hoodie dress |
I have always loved a hoodie because I'm a shy person (really?), and hiding is my top talent haha!
Kidding aside, I had been wanting to make hoodies for a long time, but hoodie dresses were something exciting because I haven't yet owned one.
So here's a Youtube video playlist that I compiled for you to see how I made the piece.
 |
| Check out the videos here... |
My model in this sewing demo is my doll Aki, which is in a Curvy Made to Move Barbie body. You may be making this piece for a different doll body type, but you can still use this process I have compiled. Just make sure you have the right pattern for your doll. If you are interested, this curvy hoodie dress pattern is available at my Etsy shop, atelierniSHASHA.
And for you dollings who like the good-old printable sewing instructions version, here you go. I've compiled the steps and photos for you. Print it out or save it as a PDF for later use. Have fun making this hoodie dress for your doll!
Tools and Materials

Knit/stretch fabric
Sewing thread
Basting thread (different color)
Handsewing needles or sewing machine
dressmaker's pins
fabric scrissors
seam ripper
soft cord for hoodie string (I just used untangled embroidery thread)
beads
needle to insert the string through the hoodie casing/hem fold
ruler
measuring tape
sewing pattern
fabric marker or pencil
model doll
Step 1
Trace your patterns on the wrong side of your stretch/knit fabric. You'll need a front panel, a back panel, two sleeve pieces, two hood pieces, and a pocket.
NOTE:
As you can see in the next photos, the back panel is one whole piece with a cut-out on the upper center part. The "darting" or cutting off of the fabric at the curvy's upper middle back part was to make sure the dress fits them well on the upper part/torso.


Please note that for Made to Move ORIGINAL doll Pattern, the center back is cut straight and not having the upper dented part like this for curvy.
Please trace two back panels, left and right, then join them together later to make a whole piece as your back panel.
Thank you and love lots - shasha
Step 2
Cut out your fabric pieces, making sure you allotted the seam allowance you are comfortable working in. I like to add 5-6mm or a quarter of an inch to my sewing patterns as my seam allowance.

Let's start sewing!
Step 3
Take your front and back panels, and join them together at their shoulder seams.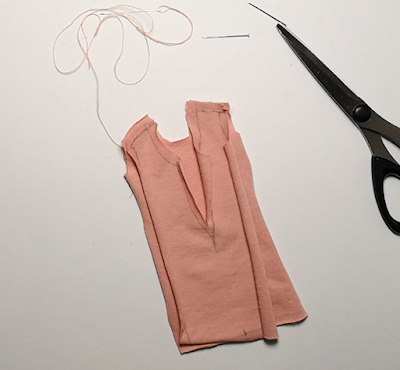

Step 4
Close up the center back seam.


Step 5
Cut slits along the curvy parts of your armscye or armhole, as well as those curvy edges of your sleeves.

Step 6
Pin-baste your sleeve fabric pattern to the assembled piece, starting at the shoulder tip at the middle part, and then at the underarm points at the sides. Continue to pin-baste the middle parts.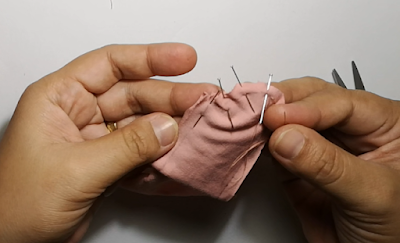

Step 7
Once your sleeve seams are temporarily secured by your pins, you can start sewing.


Step 8
Once both sleeve seams are sewn, continue with hemming your sleeves.


Step 9
Once both your sleeves are hemmed, continue with sewing the side seams of the dress.

Step 10
Once both side seams are sewn, hem your dress. Pin-baste first if necessary.

Step 11
Once the dress hem is done, let's take the hood pieces and join them together at their back seam. Pin-baste first if you needed to.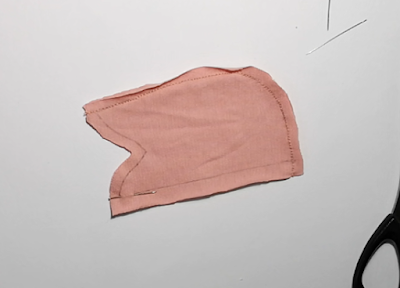


Step 12
Once the hood is now one whole piece, hem to close the edges.

Step 12
Once your hood piece is hemmed, cut slits along its seam allowance, which attaches to the neckline of the garment.

Step 4
Cut slits along the neckline as well as the side seam allowance since they are curved lines. Trim off the excess fabric.

Step 15
Once the inside of your garment is free of extra seam allowance that may cause bulk and bunching, flip to its right side.

Step 16
Attach your hood piece around the neckline. I would suggest to temporarily pin-baste starting at the center back point, then to the two front points, then the shoulder points.

If you don't like hand sewing with pins snagging your threads, I recommend to stitch-baste using a contrasting colored thread.

Step 17
Stitch the neckline to attach your hood piece permanently.

Step 18
Once the hood is fixed on the neckline, topstitch to reinforce the seam. I like to stitch-baste first before doing the actual topstitching.

Step 19
Hem the edges of your front pocket then sew in your front pocket piece. 


Step 20
Take your cord or string and take the length you need.

To insert the cord into the hood hem fold, I used a curved upholstery needle. Since our hood now is almost circular, either we use something like this or a very small safety pin to bring our string in and out of the casing.

Step 21
Since we are using a knit fabric, you don't need to cut into the weave. Just dig your needle in to find a small hole to get into. This way, you don't worry about fraying.

Step 22
Once your needle is able to come out from the other side of the hood, pull your string and seal the ends with knots and beads. Your hoodie dress is done!

Take your model doll and check your garment for fit, bulk, etc.

Now your doll is ready for a photoshoot or diorama scene!
Thank you so much for checking out my products and tutorials, dolling!
I hope to see you on my next one!
xoxo,
shasha
Nice hoodie dress.
ReplyDeleteCustom Hoodies Dubai
Thank you so much!
Deletethanks
ReplyDeleteYou're welcome!
DeleteAmazing article ,thanks for sharing this. Take a look at j america vintage hoodie
ReplyDeleteI will share my how-to-sew instructions soon.. Please watch out for it. Thanks!
DeleteHoodies! they need an extended , somewhat difficult history within the uk . Its history within the UK is analogous to what 18 to 24-year olds need to undergo with their parents during the long difficult years of teenagers. Hoodies are the symbol of teenage angst and devil-may-care attitude.
ReplyDeleteFor more visit here my hero academia merch
Wow, thanks for your insights! I agree with it being a symbol of such attitude. Thanks for dropping by!
Deletethanks
ReplyDeleteYou're welcome!
DeleteSuch an Amazing hoodie you have shared with us.
ReplyDeletej america vintage hoodie
My pleasure!
DeleteThat looks great! I have a black hoodie I feel is so dull...I believ it will have a similar makeoverf.
ReplyDeletefemale mini skirt
tracksuits for women
Thanks so much!
Delete
ReplyDeleteThis Site give information from another people very well I am impress its information an information is very nice.logachi
Happy to share my process here!
DeleteCan't wait to try this pattern. I think I will attach the pocket to the front piece before sewing the side seams, though.
ReplyDeleteYes, I noticed that too as I make more and more of this garment :)
DeleteVery cute. Just a friendly tip. I think it would be easier to attach the front pocket before the garment is sewn together. When I try making this, that will be the “first” thing sewn on. 😊
ReplyDeleteI was thinking the same thing.
DeleteYou guys are awesome! Definitely a great tip! Thanks so so much!
Delete