How to Sew: Doll Dungaree

Welcome back to yet another dolly fashion project with Shasha - your doll friend from the Philippines!
Today we are making this DOLL DUNGAREE.
As always, our sewing procedure applies to all our patterns for different doll sizes.
In today's demo, I made one for my Rubeus Hagrid doll.

Here are Hagrid's measurements, by the way.
.png)
In the future, I will share photos of different size versions I made for our other dolls, too.
For now, all eyes on Hagrid, please!
Alright, let's rally in the things we need for this little project.
TOOLS AND MATERIALS
❤ WOVEN fabric (light, not stretchy)
❤ fabric-marking pen
❤ fabric scissors
❤ sewing needle/s or machine
❤ matching thread
❤ basting thread (contrasting color recommended)
❤ dressmakers’ pins
❤ tweezer
❤ seam ripper
❤ measuring tape
❤ thread cutter or small pair of scissors
❤ small stick or chopstick
❤ (2 sets) doll-sized/mini buckles OR a combination of hook-and-eye set and doll buttons
❤ ❤ ❤ sewing patterns and instructions
 |
| Tools and Materials for making this Doll Dungaree |
 |
| Alternative dungaree buckle set = 6mm doll button and the eye part of a hook-and-eye set Okay, first and foremost, let's take our pattern page and look at the pattern pieces. Below are the pattern pieces you will need for this project.  Notice the odd-shaped one at the lower right part of the pattern page? That's not an actual pattern piece but a measurement guide for cutting your straps and waistband fabric pieces. 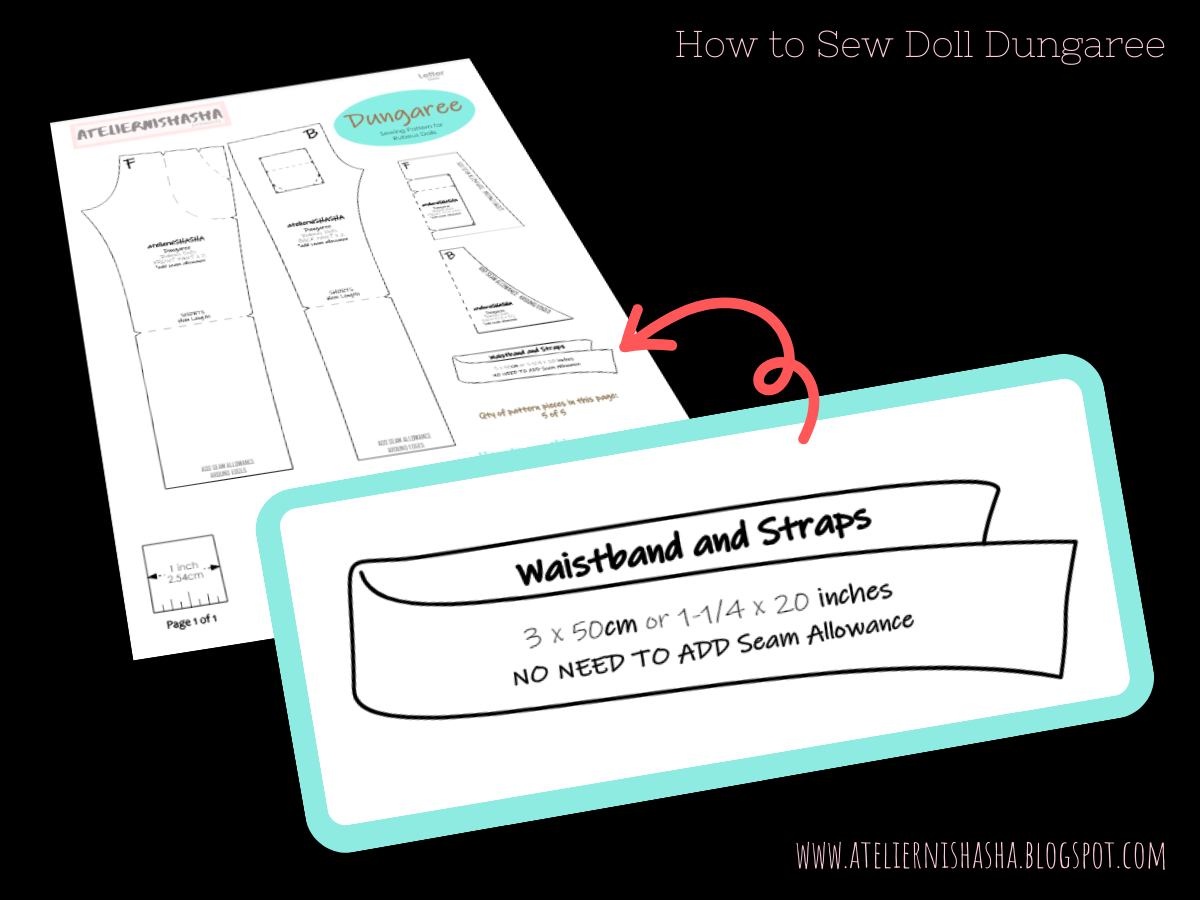 |
Alright - now that that's already out of the way, let's start constructing the garment.
SEWING PROCEDURE
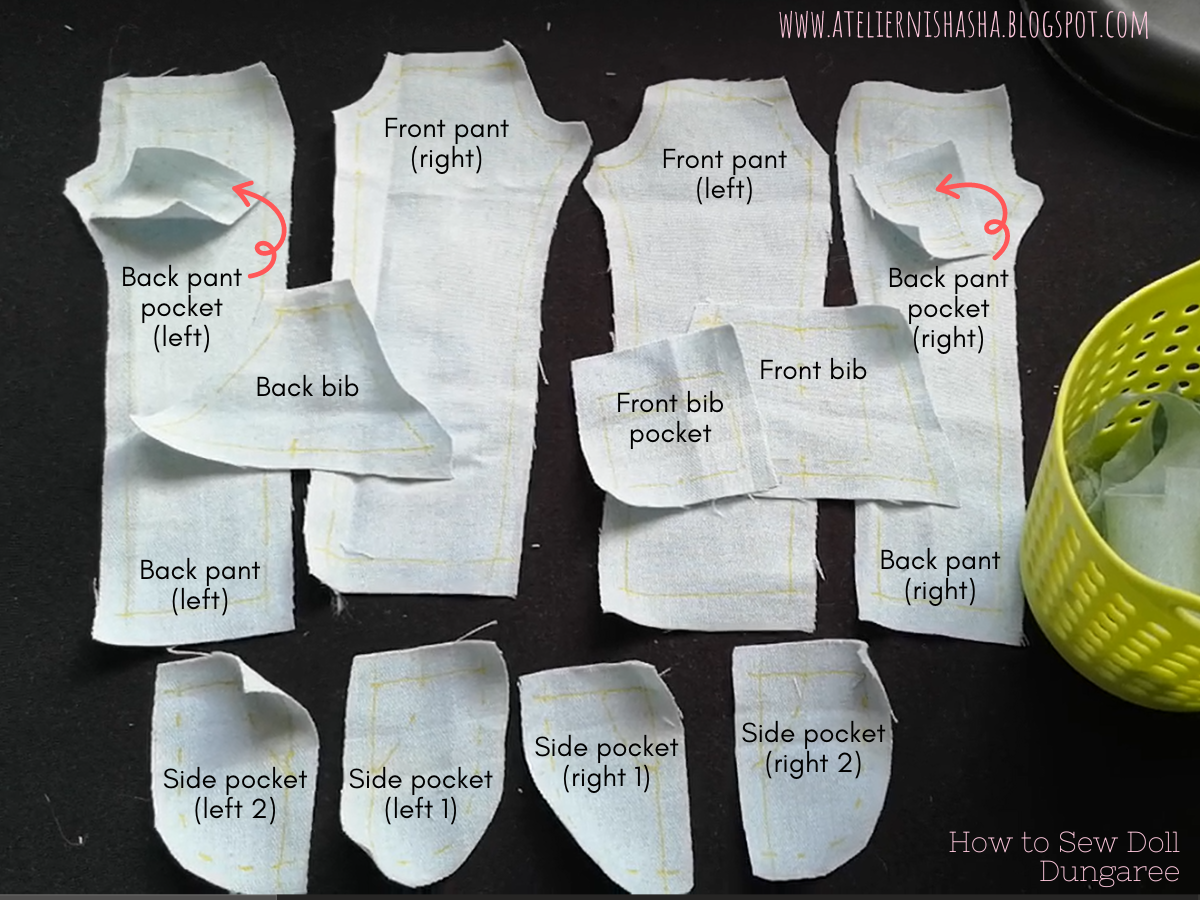
Step 1 - Trace pattern pieces on the wrong side of the fabric.
Step 2 - Cut out your fabric pieces after adding/marking your preferred seam allowance.
I use a 5-7mm seam allowance initially then trim off if needed.
This piece below is for the two bib straps and waistband fabric pieces.

For the Hagrid doll, I prepared a super extra 50cm (20inch) - long strip as I estimate:
Straps = Two (2) x 9cm (3.5inch) = subtotal 18cm (7inch)
Waistband = 21cm (8 1/4-inch) = subtotal 21cm (8 1/4-inch)
Seam allowance = Straps = 2 x 1cm each = 2cm x 2 straps = subtotal 4cm (1.5inch)
Waistband = 2 x 0.5cm = subtotal 1cm (3/8-inch)
Step 3 - Take your front pant (left) and side pocket (left 1) fabric pieces.
%20and%20side%20pocket%20(left%201)%20fabric%20pieces..png)
Step 4 - Make the two pieces face each other's right sides.
Pin-baste to prepare for stitching.
Do the same for the front pant (right) and side pocket (right 1) pieces.

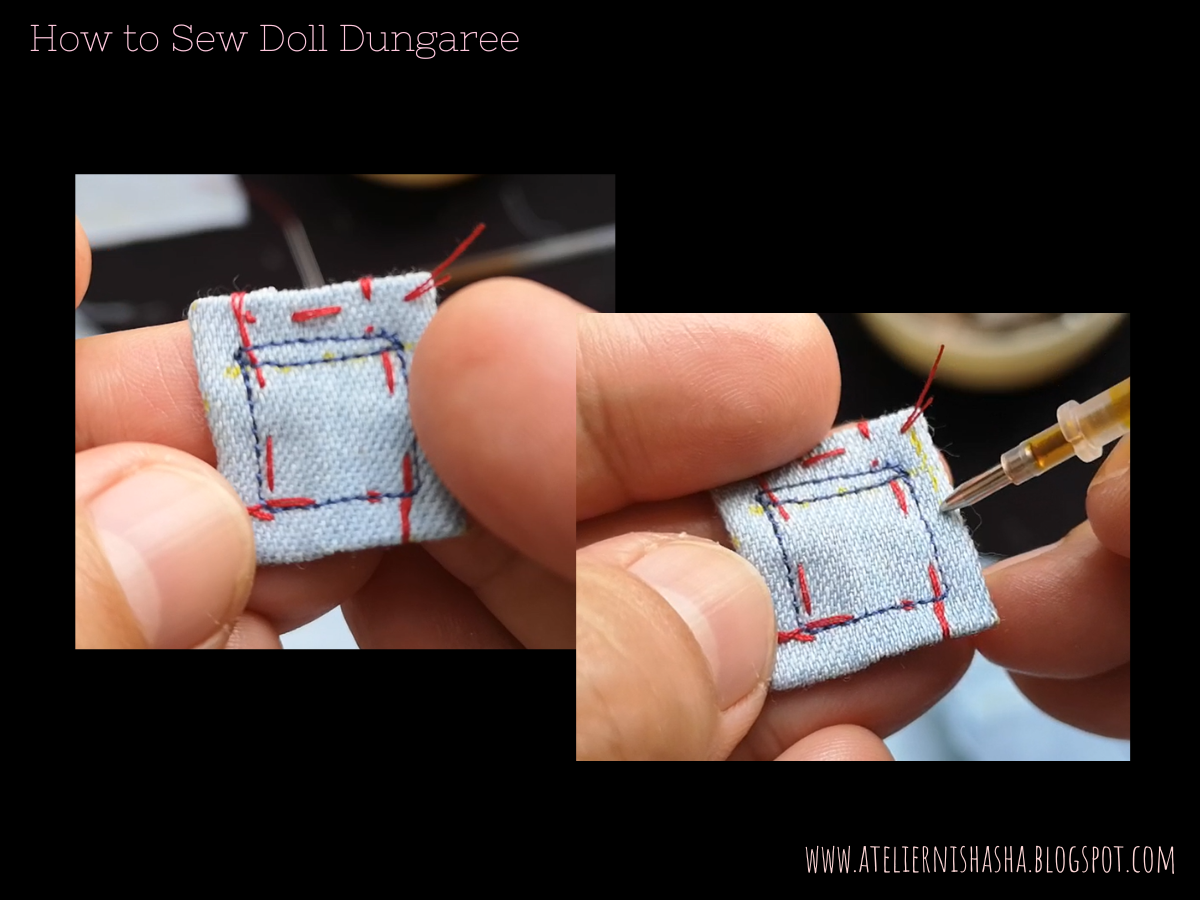
Step 5 - Sew the pocket openings.
.png)
.png)
.png)
.png)
Step 9 - Remove the stitch-bastings once done.
.png)
Place the side pocket (left 2) behind the front pant (left) such that its side shows ready to be pin-basted to the back pant (right) piece.


Step 11 - Do the same for your front pant (right), side pocket (right 2) and back pant (left).

Step 12 - Stitch to secure the outseams.

Step 13 - Close the pocket bags.

Step 14 - Stitch to secure the alignment of the side pockets to the waist.

Now, let's move on to the back pockets.
Step 15 - Take your back pocket pieces and stitch-baste around to prepare for hemming.

Step 16 - Run a stitch around to secure folds then mark the edges (yellow fabric pen in the photo below) to where your topstitching will be.
Step 17 - Stitch-baste your back pockets to your back pants (I used white thread here) to secure them before topstitching.
.%20(1).png)
Step 18 - Top-stitch/sew on both pockets to the pants then remove stitch basting.

Step 19 - Topstitch as well as the outseams and the pocket side seams (optional) for sturdier assembly.

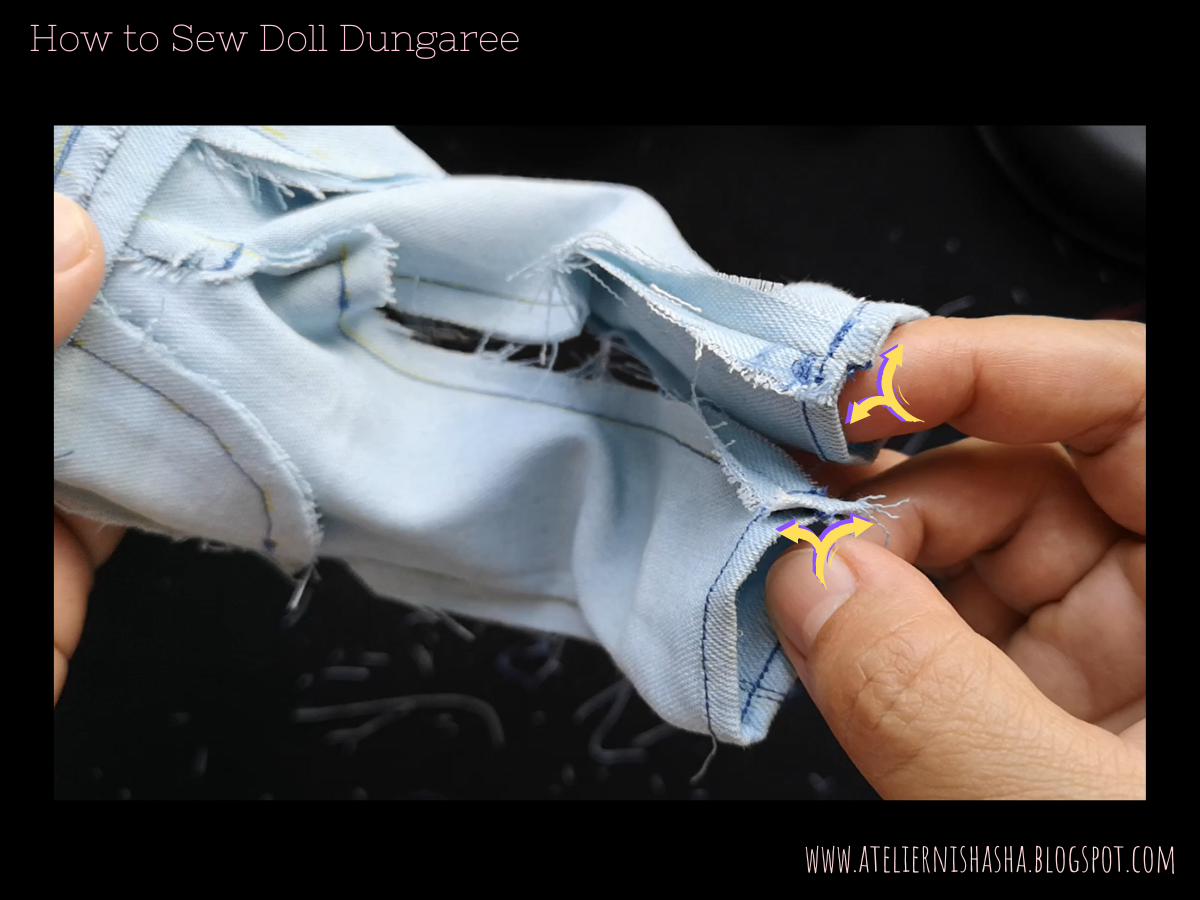
Step 20 - Pin-baste the front crotch seams then stitch.

Step 21 - Cut slits along the curvy edges of the front crotch seam allowance.

Step 22 - Flip the front crotch seam allowance to your left-hand side.

Step 23 - Run a J-shaped stitch along the side of the crotch seam to make it look like a zipper flap.


Step 24 - Hem the bottom edges of the pants.


Step 25 - Grab your 3cm (1.25-inch) fabric strip and prepare to create a waistband.
%20fabric%20strip%20and%20prepare%20to%20create%20a%20waistband.%20.png)
.png)
.png)
Step 27 - Mark your waistband thickness, which in this case was 5mm (1/4-inch).
.png)
Up next, we will assemble our front bib.
Step 28 - Prepare your front bib and its pocket fabric pieces.

Step 29 - Take the pocket piece, fold the hem allowance to the back, and baste.

Step 30 - Secure the basted folds with final stitches.

Step 31 - Take the front bib fabric piece, and stitch-baste your pocket piece to it (red thread in demo).
Note: I added two vertical lines on the front bib for added details.

Step 32 - Secure with final stitches the basted pocket piece to the bib piece.

Step 33 - Remove the stitch basting.

Step 34 - Grab both your front and back bib pieces, fold their hems, and baste.

Step 35 - Secure the folded hems with final stitching then remove basting.
The bibs are ready!

Step 36 - Grab your pants assembly and cut off some extra seam allowance along your waist seamline.

Step 37 - Take your front bib and sew on the waistband.
Note: Align the markings on your waistband with the bib seamline. Pin-baste first if needed.

.png)
.png)
Step 38 - Sew to close the back crotch.


Step 40 - Press the back crotch seam allowance flat to the sides to prepare it for later attaching the back bib.

Pin-baste if needed.


Step 42 - Stitch to secure the back bib to the waistband.
.png)

Step 43 - Fold down all waist area seam allowance.


Step 44 - Stitch-baste this inner waistband fold you just made.
.png)
Step 45 - Then topstitch on both sides of the seams.
.png)
.png)
Step 47 - Sew the inseams.
.png)
Step 48 - Secure the inseam allowance flat to the sides.
Let's flip out again our garment to prepare for the next steps :)
.png)
We are now ready to make straps!
Step 49 - Calculate the strap length that you need - don't forget to add the seam allowance then multiply by two (2) since we need two straps.
For Hagrid, I estimated to need a 25cm (10 inches) long strip.

Step 50 - Take your fabric strip which will be enough to make two straps.
.png)
.png)
Step 51 - Fold the smallest hem you can make on one of the longer sides and stitch closest to the fold.

Step 52 - Trim away extra seam allowance.

Step 53 - Fold again and decide on the thickness of your strap and hem.
I used 7mm or 1/4-inch for Hagrid here.

Step 54 - Hem the other side and trim away extra seam allowance as well.


Step 55 - The hemmed strap is ready - cut in two for the straps.


Step 56 - Attach/stitch the back strap ends to the back bib.
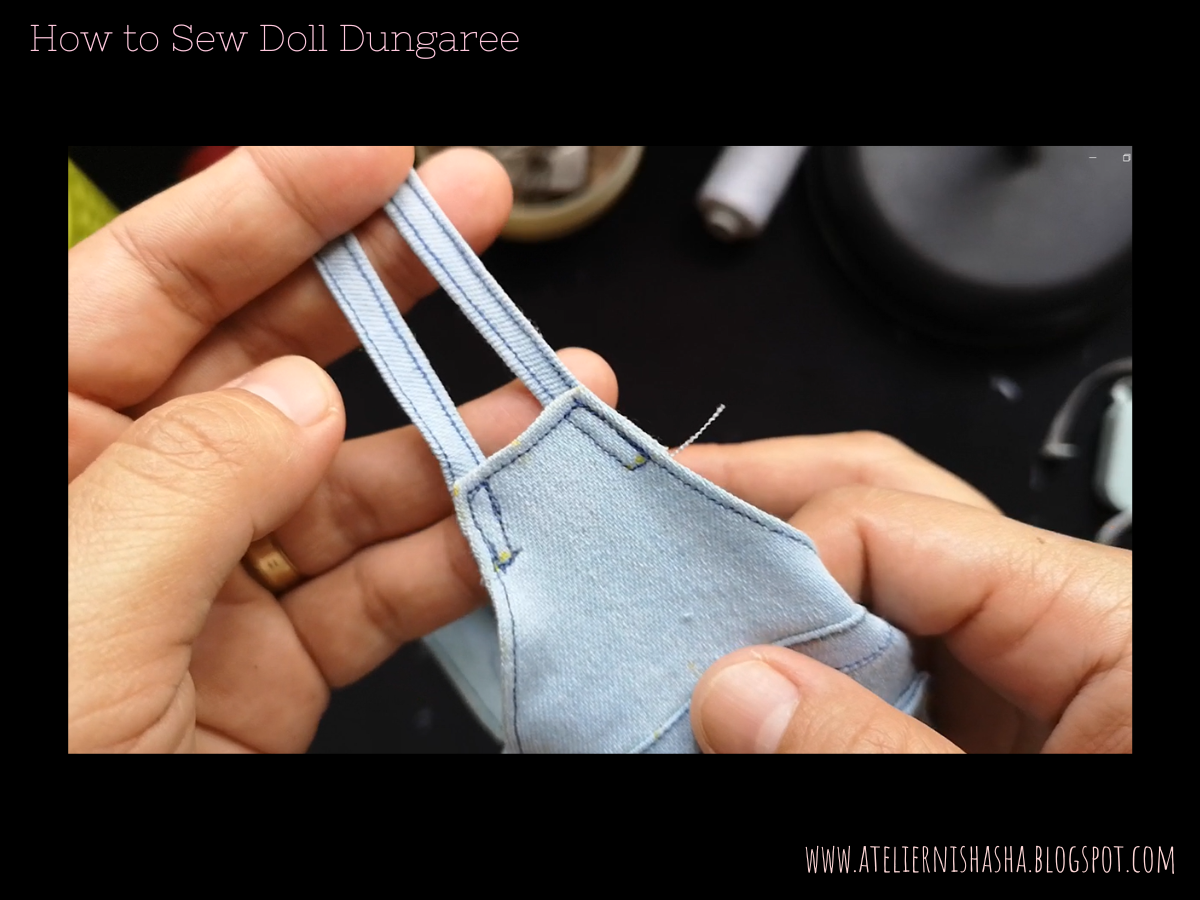
Step 57 - Cross the two straps then pin-baste to temporarily secure.

Step 58 - Stitch to finally secure the cross.

Step 59 - Take the front ends of your straps, then fold them to the actual length you will need. This fold is where we attach our "buckles".

Step 60 - Secure the fold with a final stitch.


Step 61 - Take your improvised "buckle" set. Mine is just button and 'eye" from hook and eye set.

Step 62 - Take the eye and prepare your hand-sewing needle and matching thread.

Step 63 - Sew on your eye.

Step 64 - Do for both strap ends.

Step 65 - Sew on your buttons.

Behold your creation because we are finished!

Thank you so so much for getting to this part - what a doll garment, right?
But I'm very happy to have finished mine - I hope you are also patting your own back right now 😁

If you have questions or clarifications to make about this dungaree sewing procedure, please comment below and I'll make sure to answer you ASAP.
Here's Hagrid one more time, pairing his new dungaree with a roundneck pullover.

Thanks so much again and til our next doll clothes-making session!
hugs,
shasha
Comments
Post a Comment
Let's chat!