How-to: Vintage-inspired Shirtwaist Dress
Hey, dolly loves!
Today is another day for something a little bit complex, but I assure you, it's gonna be all worth it in the end.
This how-to article will show you how I incorporate a simple collar, and cuffed short sleeves in a dress, as well as the mitered corner hem that I had been using in some of my garments but never really knew what it was called until recently.
1. Gather your materials and tools for this project.
For this one, I used the following materials and tools:
Two (2) kinds of woven fabric (one for bodice and skirt, the other for collar, facing and cuff)
Matching thread
Metal snaps (I used four sets)
Sewing Pattern (soon at ateliernishasha.com)
Pencil for marking
Pair of scissors
Hand sewing needles
Basting thread
Dressmaker's pins
Tweezer
Plastic tape
Paper scissors
Model doll

2. Trace pattern pieces on your chosen fabrics.
3. Cut all needed fabric pieces.

4. Let start making the collar assembly. Just stitch along the edges.
5. Flip to the right side.
6. Grab the sleeve and cuff pieces. Fold the cuff horizontally and stitch on the sleeve edge.


7. Do the same with the other sleeve and cuff pieces.
8. Grab the bodice pieces and seam the shoulders.
9. Stitch the two waist darts.

10. Cut slits into the neckline.

11. Grab the collar assembly and secure to the raw edges of the neckline with a pin or by basting.

12. Grab the facing and cut slits around the neckline.

13. Pin around the neckline of the bodice, on top of the basted collar.

14. Start sewing the neckline from both ends of the center front.


15. Trim off seam allowance.

16. Flip over to the right side.

17. Stitch the shoulder seam to the facing to keep it from moving around.
18.Cut slits on the armhole curves.

19. Grab your sleeve assembly and cut slits on its curves.

20. Pin or baste the sleeve assembly to the sleeve armhole to secure.

21. Stitch the sleeve assembly to the sleeve armhole.


22. Stitch the other sleeve assembly to the other armhole.

23. Next, do both the side seams.

24. At the cuffed hem, press flat the seam allowance and stitch to the sides for a neater look. Do the same with the other cuffed hem.

25. Cut off excess seam allowance on the waist darts.

26. Cut slits around the curves of the bodice waistline.

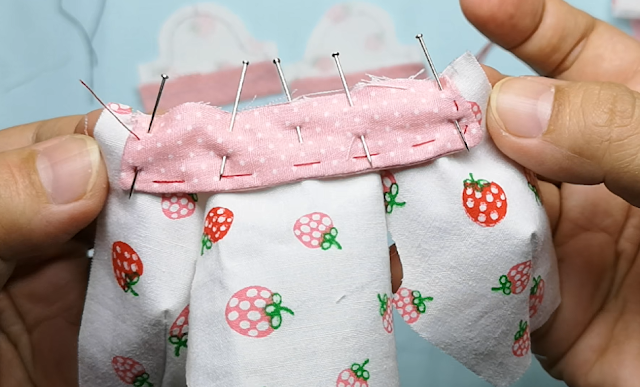
27. Grab the skirt fabric piece and run two lines of stitch on the top. You will use these for gathering the fabric together.

28. Pull both ends of the running stitches until the gathered length is equal to the bodice's waistline length.

29. Tie a knot at the end of the gathered length, which aligns with the start of the facing.

30. Pin to secure the waistline seam.

31. Sew the waistline seam.
32. Cut and remove the gathering stitches.


33. Fold the hem from the placket to the skirt hem. Pin to secure.

34. To have a clean corner hem, I used something like that of the mitered corner technique. I also use other methods for some of my other garments, but this one seems to give me the smoothest corner.
To create a corner hem, start by folding the hem allowance inside out and get the 45 degree angle of both vertical and horizontal folds.

35. Secure the fold and cut off excess seam allowance.


36. Sew along this fold and flip to the right side.


37. Do the other corner hem and pin the entire hem in preparation for stitching.

38. Stitch the entire bottom hem, from one corner to the other.

39. Sew in snaps from the top to the bottom placket of the garment.

40. Hire an elegantly beautiful model for fitting.

And you're done!
Yey, we finished yet another hand-sewn doll garment!
I know it was a long road to travel but I hope that in the end, you would feel that it's all the worth the trouble. This project is challenging for me because I am not always making collared and sleeved garments - they are the hardest! Well, yeah, there probably are other more difficult garments to make out there, but I'm happy that I have tried to do this. Jhon, my enabler, thanks to you for making me brave into this rather unconventional project in my atelier.
Once again, thank you so much for coming over and having interest in this little project of mine.
Til our next one, dollings!
xoxo,
shasha
Today is another day for something a little bit complex, but I assure you, it's gonna be all worth it in the end.
 |
| Talk about vintage+elegance = Audrey H. |
This how-to article will show you how I incorporate a simple collar, and cuffed short sleeves in a dress, as well as the mitered corner hem that I had been using in some of my garments but never really knew what it was called until recently.
---- Before we start with the instructions below, you might like the YouTube playlist I also prepared, for your reference. Here's the link to the how-to videos of this 1950s-inspired Shirtwaist dress:
 |
| Check out the playlist here |
I wish you an enjoyable time trying out this project and yes, let's begin.
For this one, I used the following materials and tools:
Two (2) kinds of woven fabric (one for bodice and skirt, the other for collar, facing and cuff)
Matching thread
Metal snaps (I used four sets)
Sewing Pattern (soon at ateliernishasha.com)
Pencil for marking
Pair of scissors
Hand sewing needles
Basting thread
Dressmaker's pins
Tweezer
Plastic tape
Paper scissors
Model doll

2. Trace pattern pieces on your chosen fabrics.
 |
| I use two fabrics, one for the main parts like bodice and skirt. |
 |
| Another fabric is used for collar, cuffs and the facing. |
3. Cut all needed fabric pieces.

4. Let start making the collar assembly. Just stitch along the edges.
 |
| I usually baste to temporarily secure two fabric pieces together. |
5. Flip to the right side.
 |
| I basted this again later so they stay flat while being attached to the main garment. |
6. Grab the sleeve and cuff pieces. Fold the cuff horizontally and stitch on the sleeve edge.


7. Do the same with the other sleeve and cuff pieces.
 |
| Front/Outer |
 |
| Back/Inside |
8. Grab the bodice pieces and seam the shoulders.
 |
| front |
 |
| Inner side |
9. Stitch the two waist darts.

10. Cut slits into the neckline.

11. Grab the collar assembly and secure to the raw edges of the neckline with a pin or by basting.
 |
| I make sure both centers of the collar and bodice align. |


 |
| I basted eventually instead of pinning because it's more convenient for later actual sewing. |
12. Grab the facing and cut slits around the neckline.

13. Pin around the neckline of the bodice, on top of the basted collar.

14. Start sewing the neckline from both ends of the center front.


15. Trim off seam allowance.

16. Flip over to the right side.

17. Stitch the shoulder seam to the facing to keep it from moving around.
 |
| Hide the stitch as much inside the seams. |
 |
| on the inside |
18.Cut slits on the armhole curves.

19. Grab your sleeve assembly and cut slits on its curves.

20. Pin or baste the sleeve assembly to the sleeve armhole to secure.

21. Stitch the sleeve assembly to the sleeve armhole.


22. Stitch the other sleeve assembly to the other armhole.

 |
| Both sleeves now attached |
23. Next, do both the side seams.

24. At the cuffed hem, press flat the seam allowance and stitch to the sides for a neater look. Do the same with the other cuffed hem.

25. Cut off excess seam allowance on the waist darts.

26. Cut slits around the curves of the bodice waistline.

27. Grab the skirt fabric piece and run two lines of stitch on the top. You will use these for gathering the fabric together.

28. Pull both ends of the running stitches until the gathered length is equal to the bodice's waistline length.

29. Tie a knot at the end of the gathered length, which aligns with the start of the facing.

30. Pin to secure the waistline seam.

31. Sew the waistline seam.
 |
| I stitched between the two running/gathering stitches. |
 |
| back/other side of the stitch |
32. Cut and remove the gathering stitches.


33. Fold the hem from the placket to the skirt hem. Pin to secure.

34. To have a clean corner hem, I used something like that of the mitered corner technique. I also use other methods for some of my other garments, but this one seems to give me the smoothest corner.
To create a corner hem, start by folding the hem allowance inside out and get the 45 degree angle of both vertical and horizontal folds.

35. Secure the fold and cut off excess seam allowance.


36. Sew along this fold and flip to the right side.


37. Do the other corner hem and pin the entire hem in preparation for stitching.

38. Stitch the entire bottom hem, from one corner to the other.

39. Sew in snaps from the top to the bottom placket of the garment.

40. Hire an elegantly beautiful model for fitting.

And you're done!
 |
| The only Silkie in my doll collection - Sabine, modelling this vintage-inspired shirtwaist dress |
Yey, we finished yet another hand-sewn doll garment!
I know it was a long road to travel but I hope that in the end, you would feel that it's all the worth the trouble. This project is challenging for me because I am not always making collared and sleeved garments - they are the hardest! Well, yeah, there probably are other more difficult garments to make out there, but I'm happy that I have tried to do this. Jhon, my enabler, thanks to you for making me brave into this rather unconventional project in my atelier.
Once again, thank you so much for coming over and having interest in this little project of mine.
Til our next one, dollings!
xoxo,
shasha
Comments
Post a Comment
Let's chat!