How-to: Wrap Dress
 |
| Fashion Royalty doll Kyori Sato models the Midi Wrap Dress |
 |
| Made to Move Original doll |
 |
| Made to Move Curvy doll |
Together, let's make the Midi Wrap Dress!
I finally uploaded the videos I took while making this wrap dress,
so please check the playlist out here on my
Youtube channel.
This applies to all my wrap dresses, regardless of doll type/size.
so please check the playlist out here on my
Youtube channel.
This applies to all my wrap dresses, regardless of doll type/size.
 |
| Youtube How-to Playlist now available, dollings. Just click here! |
Are you ready? Let's get started ;)
Here are some of the materials and tools I used to make the piece:
- stretchy crepe fabric
- thread
- metal snaps
- thick thread
- pencil
- pattern pieces
- scissors
- handsewing needles
- dressmaker's pins
- thick thread
- pencil
- pattern pieces
- scissors
- handsewing needles
- dressmaker's pins
Let's start crafting!
1. Trace pattern pieces on the fabric.
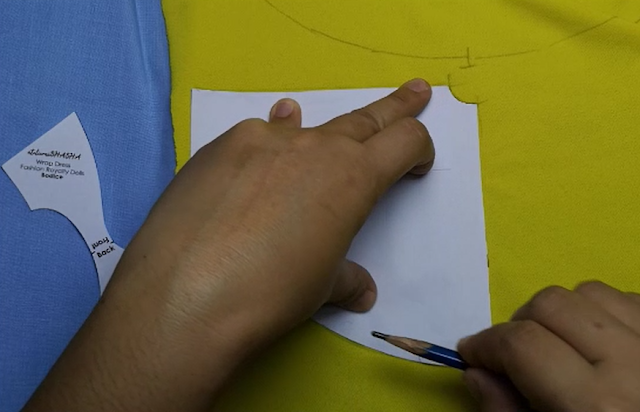
2. Cut your fabric pieces with seam allowance that is comfortable to you.

3. Attach the sleeves to the bodice' armholes. Be mindful of the front and back parts of the sleeve.


4. Do the other sleeve.

5. Hem the sleeves.

6. Do the side seams.


7. Secure the sleeve seams flat.

8. Do steps 6 to 7 with the other sleeve.

9. Join together your skirt pieces by the side.


10. Cut slits into the curves of the skirt's waistline.

11. Pin to anchor by the waistline your bodice to the skirt.


12. Stitch together the bodice and the skirt to create the waist seam.


13. Cut slits into the curvy side of your bodice's neckline.

14. Starting at the hidden wrap of the bodice, hem all around the edges of the dress.


15. Put a string to secure your hidden wrap.

16. Put snaps on the front wrap.

And voila! Your wrap dress is done!
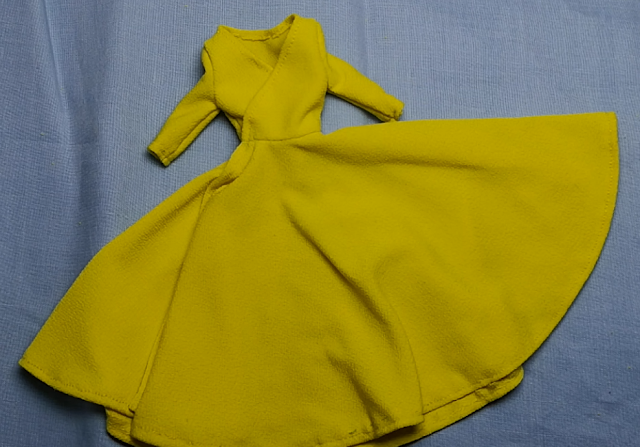
Yay!
I hope you enjoyed crafting your own wrap dress for your Fashion Royalty doll.
Please know that I am all about DIY.
So I am more than happy to be sharing my process with you guys.
Til our next DIY doll dress tutorial!
xoxo,
shasha
Comments
Post a Comment
Let's chat!