How-to-Sew: Chill Shirt for Articulated Ken Dolls

Welcome to another how-to post, my dollings!
This time we are making our dearest Ken his CHILL SHIRT.
I call this Chill Shirt because it's meant to be a relaxed piece in our Ken's wardrobe.
It is also super simple to make, compared to our long-sleeved formal shirt version.
Okay, if you are ready to craft, let's get started!
Tools and Materials

Hand sewing needle or machine
Matching thread
Basting thread (contrasting color)
Fabric scissors
Pinking shears (optional)
Thread cutter or small scissors
Tweezer
Seam ripper
Interfacing (optional)
Snaps/ Hook and Eye / Velcro or any closure material
Sewing Pattern (I used my own here, available at my Etsy shop)

 |
| Note the notches along the neckline - that's where your collar ends. |
Alright! Let's get to sewing!
Step 1
Trace your pattern pieces on the wrong side of your chosen fabric, apply an anti-fray product (optional), decide on the seam allowance to be added and cut.

Notes
* It helps that you mark the back or front part of the sleeve pieces so you don't get confused later.
* Also mark the two front panels' neckline notch, which is where your collar piece should end.
Step 2
Take your two collar pieces, let them face each other, and sew the edges except for the bottom part, which you will attach to the bodice.

Step 3
Trim off extra seam allowance to reduce bulk. Cut slits or use pinking shears on the curvy edges like the top part.

Step 4
Using a tweezer, flip your collar piece to its right side and press to flatten the seam edges.

Step 5
Take your sleeve fabric pieces and hem the edges.

Step 6
Cut slits along the curvy edges of the sleeve pieces.

Step 7
Take your two front panels and the back panel, and join the shoulder seams.

Step 8
Cut slits along the curvy edges of the neckline and armscyes.

Step 9
Take your two sleeve pieces, and align the back or front part of each sleeve to the back or front parts of the front and back shirt panels.

Step 10
Just before joining the sleeve seams, I like to baste around the actual seams so they don't move around while I sew.

Step 11
Carefully sew the sleeve seams.

Step 12
Take your collar piece and pin-baste to the neckline of the shirt.

Step 13
Find the front panel's centerfold mark, and fold the fabric so that the rest of it will join the collar at the neckline.
Pin-baste to secure.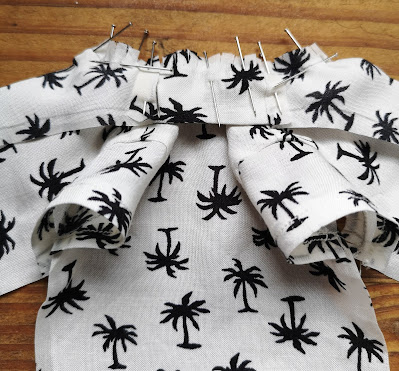

Note. The front panel folds and ends at the shoulder seams.
Step 14
Fold and pin the hem corners as well.


Step 15


Step 15
Sew on the actual neckline seam.

Step 16
Trim off extra neck seam allowance to reduce bulk.

Step 17
Stitch on the corner hems horizontally.

Step 18
Using a tweezer, flip your hem corner to its right side.


Step 19
Stitch the upper edges of the front shirt panels to the shoulder seam allowance to secure.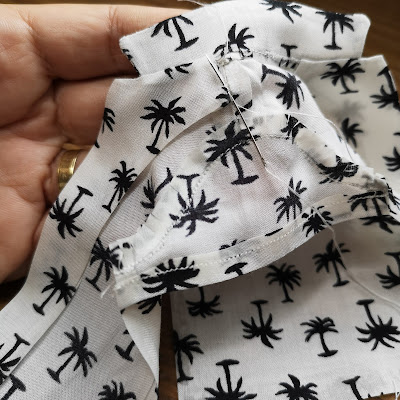


Step 20
Align your side seams and pin to secure.

Step 21
Sew the actual side seams.


Step 22
Press open the underarm seam allowance and stitch to secure.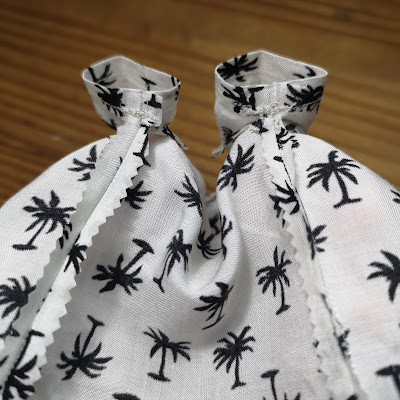

Step 23
Hem the bottom of your shirt.


Step 24
Sew in your metal snap or hook-and-eye sets to give the garment a closure system.

And you're done!

Here goes Hans wearing this Chill Shirt.

It may not look like it, but he likes it a lot!

I hope this tutorial inspires you to make your Ken doll more shirts in the future, dollings!
You can also tweak some of the measurements to give this pattern a new twist!
I'll probably try this on my gal dolls and maybe they'd like one, too!
In the meantime, I'm gonna go ahead and continue developing another pattern for our dolls, okay?
I hope you had a wonderful time!

By the way, the Youtube version of this tutorial is also now up HERE.
I hope you can check it out, too!
Thank you again, loves and much love from the Philippine islands!
Shasha
Hi Shasha! I love written tutorials, although I also enjoy your videos. I'm tempted to get this pattern, but I promised myself no more patterns until I make several versions of the ones I already got. So far I've made one top for my dolls, which isn't looking that neat, but I'm proud of myself for at least trying.
ReplyDeleteFor the girls version, maybe it could look like one of those shirts that are tied on the bottom front part. Something like this one. Now that I'm starting to make my own clothes, I'm paying a lot of attention to that BarbieStyle account, since they often repeat the same garments in different combinations. I don't want to make countless pieces of clothing, but rather make those that I can make the most of.
Wish you a lovely weekend!
Heeeey MC - thanks so much as always for dropping by for a lovely chat!
DeleteYes, that is a great strategy, my friend! I also tell myself that every time I am so tempted to click the buy button for some new fabrics hahaha! It's always good to have a system in place, whenever our subconscious just wants to decide on its own :D
Just start small and simple and without noticing, your doll wardrobe has grown immensely!
Yes, the shirt pattern can be tweaked to look like the one on Barbie Style. The sky is the limit, the moment you understand the fundamentals of a certain clothing construction - which I am lovingly sharing at my youtube channel. I am so excited for you, dear.
That is a great plan my friend, to create pieces that can be easily styled with the rest of your wardrobe. That is my ultimate dream wardrobe both for myself and my dolls.
Thank you so much again for always supporting my blog, and you too, have a wonderful weekend, dear MC <3
That was a really great! Thanks for the data and the supporting information. we provide.Beyond Ordinary Luminous, Your No.1 T-Shirt Printing Destination.T shirt printing singapore
ReplyDeleteHi Shasha, thank you very much for sharing your work, I loved it, congratulations :)
ReplyDeleteThank you so so much! Glad you loved it!
Delete